Thursday, August 30, 2007

Hardwood Floor Install - Oops


I finished installing hardwood floor in Joshua's bedroom last night. I'm about halfway done the 1800 sq ft install (2nd bedroom + hallway are left). It's gone really well and I am very pleased how it is turning out.

The flooring is 3.25" prefinished Bruce, stained cherry. Not the best quality but a good price and it looks nice once installed.

I've been laying down 15# felt atop the plywood subfloor, usually one 3 ft row of felt at a time, tacking it in place then laying the hardwood before laying the next row of felt out.
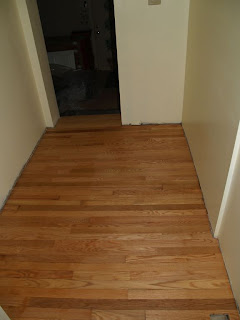
Once the floor was complete I realized that there should be one of these :
Somewhere here :
Oops.

Wednesday, August 29, 2007

Hardwood Patching / Refinishing


Over the weekend, I finished up the last time sensitive project that I had to complete. The original hardwood floors downstairs needed to be refinished, but before we could do that there was some patching to do.
The wall moving and a suspected dog stain meant two high traffic areas needed to be patched. There was also a hole in the closet, likely from the original floor plan being modified that needed a few boards to patch as well.

The first step was removing all the cut pieces around the area where the wall was in the now hallway. I used a circular saw to cut the pieces where they disappeared under the tiled bathroom floor and then a pry bar and hammer to pull them out as intact as possible.

Many of the pieces were unusable due to excessive nail or screw holes from the carpet or the closet hardware. Salvageable pieces I pulled the nails out and cut the ends square so they could be reused.
I ended up needing 20 more square feet to patch the blank areas. I could only find one local hardwood dealer that carried unfinished red oak flooring which naturally cost more than the prefinished Bruce oak that we are installing in the rest of the house. Having now installed both the prefinished and unfinished I can see the quality is much higher in the unfinished. The lack of the v-groove is also very nice. Since the floor has not been finished yet I don't know for sure, but it seemed to me that the unfinished floor will turn out much nicer than the pre-finished.

The dog stain area was a PITA to patch as it was in the middle of the floor. More than one flooring person who came to quote our job told us that it would have to be patched, that it was likely the stain was deep in the wood. I thought about sanding it down a bit and checking before patching but never got around to it. When I cut the old boards out I could immediately see that they did not need to be ripped out. By then it was too late and they were in pieces. The dog stain had not penetrated at all into the wood. Nuts.

Before and after pictures of the hallway. The after is only sanded, with no finish yet. I am amazed at how well the old and new wood blends.

Monday, August 20, 2007

My Electrical Nightmare

The wiring in this house seems to have been done by a drunken monkey. Most of the switches are not where you think they should be (near the room entrance) and don't turn-on/off the lights you think they should.

The only saving grace is that it seems to be all copper and it's a 200amp panel. I just have to go through and label all the switches. Or maybe it's worse than that.

I was trying to figure out what all the switches did and how to get all the light fixtures lit up. I couldn't get three of the wall sconses to light up no matter what switch combination I used. I pulled the sconces off the wall and found they weren't hooked up. Just hanging there, looking ugly.

There are two switches below one of the sconces. Since I couldn't figure out what they do, I pulled off the cover plate to see if they were hooked up at all. Here's what I found (bad).
Illegible duct tape labels and bare wires. Nice.


Friday, August 17, 2007

Hardwood Install - Done?


95% finished anyways. Long day yesterday and more time this morning, but the living room is done except for the nosing on one stair. I'll finish that up tonight and move the tools back up the stairs.


Wednesday, August 15, 2007

Close to crunch time

Move day is Saturday. I've got 500/1800 sq ft of hardwood installed and no time left to install it all. We've prioritized the list and decided that the family room must be completed so that we can put all the couches and bookshelves in there on Saturday.

So of course that's the hardest room to get ready for hardwood.

Actually, the room itself is not to bad as it has almost all square corners and no closet to install hardwood in. Problem is that it has (had) carpet with a tile surround.

The carpet ripped up easily, and Rosemary pulled out the staples fairly quickly. We took 3 hours to bash and then clean out the tile with a 5lb sledge and a hammer.

This left the original plywood subfloor covered with the grout and thinset used to put the tile on. The monkey that installed in used at least three kinds of thinset and they bonded with varying degrees of success to the plywood.

I flipped a quarter and decided to try and remove the thinset rather than rip out and replace the plywood. I asked a couple of flooring guys and ended up renting a Hilti TE 905-AVR Breaker Hammer. This is one bad ass tool. I got it with a 5" and 3" bit. It took me about 3 hours to clean off all the plywood to get it to a flush enough surface for the hardwood install. Well worth the rental. I think it was $50 for 4 hours. The rental place also sold the tool - $2000.

The right tool for the job.
The family room is only 400 ft so even allowing time for screwing down the subfloor, laying the felt, priming one section to cover up a dog piss smell, we should be able to get this done tonight and tomorrow. Then I get back to work on Joshua's bedroom.


Monday, August 13, 2007

Now you see it...

This is part of the floor plan for the first floor of the new house. Like the carpet that covered the hardwood in the office, I knew right away that I was going to change this. Closet C3 and door #2 for the bathroom didn't make any sense and had to go. After verifying that the wall in back of C3 was not load bearing, I attacked it with a hammer.

Removing the drywall was not difficult, the cleanup was a bit of a pain though. I filled up a couple of garbage cans and boxes with debris. Part of the wall I removed was the original plaster which is of course heavier than drywall.

I spent way too much time attempting to pry and cut out the wall and closet header with a hammer, pry bar and hand saw. I eventually gave in and ran down to Home Depot to pick up a corded Dewalt Sawzall. I actually went to get the Ridgid saw, but they were out so the sales guy gave me the Dewalt for the same price ($20 difference). It came with 5 extra blades and a stainless steel coffee mug that I'll never use.

10 minutes after plugging the saw in, the wall and header were gone and the area is ready to be reframed and drywalled.

I should write this on my hand so I don't forget it. Don't waste time working with the wrong tools, buy (borrow or rent if you have to) the right tool for the job!

(pictures below taken from the arrow in the layout diagram above)


Wednesday, August 8, 2007

Long Weekend Work

We took possession of the new house a week ago and this past weekend was our chance to get some work done. I forgot the camera at the house so I don't have any pictures, but here's what we've completed with the help of Rosemary's parents.
  • tear out two (extra) bathroom doors and frame / drywall the opening
  • tear out a closet wall to open up a hallway and frame another opening beside it
  • tear out 260 sq ft of tile and the carpet in the family room
  • tear out carpet in the master and two other bedrooms upstairs
  • removal of many weeds and bushes around the property
  • one load of construction debris to the dump (200kg = $20)
  • 90% installed new plywood flooring in attached garage for workshop (more to follow)
  • 2 upstairs bedrooms mostly painted

Last night and this morning I started pulling up some of the flooring in the downstairs office that needs to be patched. It'll take at least a box (22 sq ft) of unfinished flooring to patch the holes left from tearing out the closet.

We're trying now to find someone to finish up the taping and mud for the drywall as my mud/taping skills leave a lot to be desired.

The future garage/workshop looks really great...

Friday, August 3, 2007

Hiding under the carpet

After moving a truckload of boxes into the kitchen, I walked around the house to take a closer look at the hardwood I was planning on ripping out. I hadn't been in the house since we last checked it out a month ago and from memory I had thought it was prefinished, bleached oak 2 1/4" hardwood. Since we don't like the light colour and it is difficult to change the colour on prefinished flooring I figured on ripping out that hardwood and replacing it all with new, darker oak (prefinished).

On the weekend Home Depot at a 10% off sale if you opened a credit card (max $300) + 6 months no interest on any purchase over $450 (no fees). The local store also had a special on Bruce 3 1/4" cherry stained oak for $3.99/sq ft which was the dark colour we were looking for. I had taken some rough room measurements so I knew we need about 1000 sq ft to replace the wood in the living room, the carpet in the attached office and the tile/carpet in the attached family room.

Well, I no longer need that wood for the living room as we are going to get it refinished. Taking another look at the new carpet in the office I quickly realized it was hardwood underneath. 10 minutes later I had the new carpet and padding torn out and the dirty original hardwood exposed.


It looks like the office and the living room are the original (1947) floors. A couple of walls have moved around in the office so there is some patchwork to do, but refinishing will save us time and money.
This also means that I can either return the hardwood to Home Depot or use it upstairs. Now that all the furniture from the renter's is gone we can see how bad the carpet is up there. So we've decided to put down hardwood in the 3 bedrooms + hallway upstairs. We've got to order some extra hardwood (30 boxes) but now's the best time to do it, since we've got 17 more days until we move in.

Yesterday we had a delivery from HD. 55 boxes of hardwood @ 50 lbs per box is 2750 pounds. I moved all those boxes to from the garage where they were dropped into the attached breezeway so they can aclimitize. Later on I'll have to move all 55 boxes through two doors and up the stairs (13 stairs) for the install. Good fun.

They also dropped off some lumber for Joshua's sandbox and my shop. Luckily they were able to drop the 24x5/8" plywood for the shop floor in the back, but the pressure treated lumber was too long to fit through the gate on the forklift. I had to move those 42-2x4x12s, 7-2x12x12 + other misc into the back with the truck. Two big loads. A good workout.

Thursday, August 2, 2007

Our New (Old) House


Yesterday we took possession of our new house. Above you can see the front of the new house, that's my holding Joshua and my Mother-in-law beside me. The house was originally built in 1947, and major renovations were done in the late 80s and early 90s, adding approximately 1500 sq ft to the home.
We are very happy with our new old house - our other house was built in 1987 and has no character. This new house is in a much nicer part of town, on a larger lot and quieter street. We've already met the neighbours on both sides and across the street and they all seem very nice. One of the neighbours has two young children that are close in age to Joshua so he's already got some new friends to play with!
The previous owners had moved out a year ago and so the house was occupied by renters. They moved out most of their stuff over the past two days and left two huge piles at the curb. Last night we moved a few boxes of our stuff over and dumped the rest of their stuff at the curb. Luckily this morning was garbage day and it is now all gone.
We have also sold our other home but don't close on that one until August 20th. So we have almost three weeks to get in and get some work done on this house. It will be a very busy three weeks.
Below you can see the back of the house, with a nice large stamped concrete patio. Also in the back of the lot is a detached two car garage...soon to be my new shop. It's so nice I'm jealous of future Mark who get's to work in it :)

Wednesday, August 1, 2007

Silence is Golden

The vast majority of my woodworking is done with powertools. The mitre saw to cut to rough length, the table saw to rip to rough width. Flatten two sides using the 6" jointer, then plane to the final thickness.

Back to the table saw to rip it to the final width and the mitre saw to the correct length. Depending on the piece it may be sanded before or after assembly with a 5" random orbital sander. Maybe I'll need to add a profile or dado using the router, pocket holes using a drill or biscuit slots with a biscuit cutter.

All these tools are noisy and generate lots of dust. I attempt to catch most of the dust at the source with a shop vac or the 1hp dust collection system. There's also an air filtration unit hanging in the middle of the shop to catch more of the fine particles.

I always wear safety glasses (prescription for me) and over the ear hearing protection when using these tools. I'm happy that these tools perform well and allow me to do more woodworking in the little time that I have available to do it.

However once in awhile I get to do a little bit of work with my meager collection of hand tools. Yesterday while I waiting for some glued up panels to dry I used my bargain basement hand plane to ease the edges on the rails and styles of the head/footboards.

Just two or three swipes of the plane produces some fine shavings and eased corners. No noise or dust. Nice.