Friday, July 31, 2009

Kids Table - Part 1

We need a new table for the kids to use - should I go to just go to Ikea and buy one or can you easily build one?" Rosemary asked me this a few nights ago and I was immediately energized into working on a new project.

Of course there was no way we were buying a table from Ikea when I had a workshop full of tools in the backyard and plenty of extra wood! I came up with a plan in my head the next day while I was out for a run and later than night I got to work.

The table size was based off one we already have - a pine table that someone bought when Joshua was born. The new table would be the same size but built of Oak and Walnut. The top would be 24" square and the legs 21" high. With the dimensions decided, it was time to pick out the wood. I dug through the pile of Oak and found a piece a little over 8" that I could edge glue up for the top.

I made this sketchup drawing after I'd already finished the table - but here's what the completed table will look like :


The Tabletop

I set the planer up to spew the shavings onto the driveway, with infeed and outfeed tables to help guide the wood. With this setup I always lose a few inches off the end of the board to planer snipe, but I plan for this so it's no big deal. After the planing is complete it is easy to shovel up the shavings into a barrel - much easier than emptying the dust collector. In fact I usually don't even have to do the shoveling myself - Joshua loves to do it.

After planning down the top board to 7/8", I chopped it up on the mitre saw at 25" to get the three pieces that I'd need for the glue-up. Over to the planer where I cleaned up one edge, then the tablesaw to get a parallel edge.

I lined the pieces up and marked for biscuits, then cut three biscuit slots in each piece to help align them for the glue-up. Joshua joined me at this point to supervise the construction of his new table. After applying glue and inserting the biscuits I clamped the tabletop up tight and stood it in the corner to dry overnight.

The legs will be 1 7/8" thick and since I only have 4/4 stock on hand I needed to glue up a couple of pieces for each leg. For a kids table I decided not to do anything complicated but just leave the edge grain showing on each leg. I figure it'll soon be covered in crayon and pencil marks anyways.

Before closing up through the night Joshua and I planed and jointed some more oak for the legs, I cut out 8 - 2 1/8" x 22" blanks, then glued them up with the rest of my clamps. I'll leave them to dry overnight before finishing them up with the joiner and planer.

Thursday, July 30, 2009

Quack! Quack!

Joshua and I spent a bit of time in the workshop while Mommy was out with Lauren. First we cut an ugly looking lopsided 'tennis racket' out of some 3/8" plywood on the bandsaw, then over to the scroll saw to cut up some scrap pine.


I drew up a quick duck on the pine and cut it into a little jigsaw puzzle. Both Joshua and Lauren like playing with it. It was first the jigsaw puzzle I've made - Joshua is now asking for a tractor or elephant jigsaw puzzle.

Craftsman Mailbox - Step 5

I've been too busy to post updates here, but I have been working some woodworking and house projects.

The mailbox had to wait for a week or two, but it's finally got two coats of stain and now is just waiting for two coats of finish before being mounted. I put on one coat of Minwax Provincial oil stain, let it dry overnight then rub it out a bit with a synthetic steel wool pad before putting on the next coat.


I've had another project waiting to be stained as well, probably for about 3 months, so I put two coats of stain on it as well. It's a chair that will be hinged in the seat to fold over and become a small step-stool.


All the finish was applied in my new finishing room - the loft above my workshop which has been cleaned up enough to be used as a finish area. I need to add a fan to increase ventilation when I am using oil-based stains.

Wednesday, July 8, 2009

Playhouse Rocketship - Lessons Learned

The Rocketship is not complete. I still need to finish up :
  • adding a cone on top
  • adding trim pieces to cover the joint where the two halves meet up in the body of the rocket
  • adding some stickers or painting the rocket - Canadian flag
  • adding a periscope that sticks out of the top
I've got somewhere between 10-15 hours into the project but if I was to build it again I would make some changes.

First, the things that worked.
  • Rocket engines made up of 2x material
  • Bandsaw circle jig - doesn't cut perfect circles but close enough for this kind of project
  • White hardboard - cheap and easy to bend
  • Cargo strap clamps
  • Titebond III
  • Cheap roto-zip clone for cutting white hardboard
Things to improve for next time
  • Rather than overlapping halves for the inner ribs I should have just made two circles halves then bolted them together
  • When gluing the White hardboard on the rocket body, I neglected to put masking tape on the upper base circle which led to the hardboard gluing to where I didn't want it to. This made separating the two halves very difficult
Still, it's been a fun and somewhat challenging project. Joshua played in the rocketship with his cousin on the weekend and they had a great time. I'm not sure when I'll get to finish it up as Rosemary has me working on other things, but in the meantime at least he's got half a rocketship.

Tuesday, July 7, 2009

Kerdi Shower Install

I started working on adding a bathroom to our master bedroom almost a year ago. When I installed the hardwood before we moved in (almost two years ago) I left a blank spot in the large master bedroom so that we could add a bathroom. Almost a year later I started work on that, hiring a plumber to run the supply and waste lines - it was a difficult job to run the lines through the crawlspace and I didn't feel up to it.

After that was completed, I started with the framing, then hired someone to hang and finish the drywall (with me as assistant). After painting I took on the floor as my first tile job ever. It took me forever - well three days anyways. I put down an electric heating mat and Ditra to ensure a waterproof and stable floor. After finishing I thought it was horrible until I added the grout. Now the floor looks great.

The toilet and vanity were installed mostly without issue and I hung the mirror.

Now a few months later it's time to start on the shower. I ordered the Schluter shower kit about the time I started the bathroom a year ago and it's time to start the install.

I had to start by cutting down the drain pipe. The plumbers left it proud of the floor about 6 inches by for the pre-formed shower pan it needs to be about 2" below. I had an old cut-off wheel for my electric drill that was about 3" in diameter. I trimmed it down with a bandsaw to fit inside the drain pipe and then cut that thing down in about 30 seconds. I spent more time thinking about how I was going to get it done than the actual job. I was worried that I'd have to attack it from the bottom which would have been much more messy.


Next I mixed up the mortar and spent the rest of the day hanging sheets of Kerdi like wallpaper. Pretty simple stuff, just follow the instructions and make sure you overlap all of the sheets by 2". The kit I purchased did not have enough Kerdi to cover the entire shower so I'll have to buy some more before I can move on to the next step.

At the end of the day the local inspector stopped for for a visit. I think she approved it :)

Friday, July 3, 2009

Playhouse Rocketship - Part 10

After letting the rocketship 'cook' (dry) in the clamps for 24hrs, I removed the clamps and screws then attempted to pull the two halves apart. No dice. More persuasion did not help.

I climbed inside and slid a thin blade around on the first half or back of the rocket which should have only been glued to the bottom circle. Ahh, not so. There were two spots where glue must have squeezed out from the bottom circle onto the top one and securely fastened the side to the top circle. I freed up some of the mess with a flush cutting saw and eventually had to use a chisel to completely free it. I should have used masking tape on the top circle for that half. In any case I eventually got it apart...


It took a little help from my persuader which slipped and bashed a nice crack in the side of the rocket. A curse or two may have been heard in the shop after this incident.


Presto - a crack becomes a back 'escape' hatch.


I used my hand card to move the rocket halves separately to the house. They are pretty light but are large and so awkward to move single handely - as you can see I had some assistance.


Here's the complete-enough-for-now rocketship playhouse fully assembled in Joshua's room. I attached the rocket engines to the bottom circle with 2.5" wood screws before sliding in the top half. Plenty of room for Joshua and I to go inside and read some space books - the first one we read was 'Astronaut Handbook'.


Thursday, July 2, 2009

Railroad Clock Kit - Finishing...

The clock kit that I started more than 6 months ago is back in my office after having a short stay in the workshop.

It was in the workshop for a bit of final sanding and then two coats of Watco oil and two coats of Minwax wipe-on poly. I really like how it turned out. Now I need to add the clock mechanism, glass and hinges. It should be done within the next 6 months...


Playhouse Rocketship - Part 9

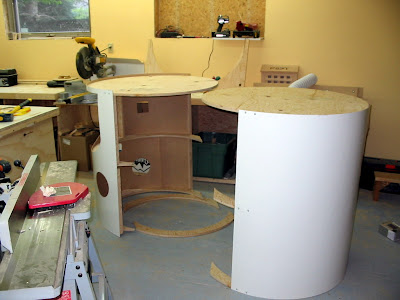
A short one today. After the first half had dried I struggled with the clamps and installed the second half. There are two plywood circles in the base, this section was glued to only the top circle. To protect the bottom circle from squeeze-out I covered it in masking tape and was very careful when applying the glue to the top circle.

After I had everything in place I had Joshua come out and inspect the end result. Now this is really starting to look like a rocketship. (Or a grain silo)