Friday, August 28, 2009

Deck Replacement - Part 5

The deck is getting close to done now. I finished up the first level of stairs. I think the stairs are going to take longer than the rest of the deck. They are complicated by the fact that I am using the underdeck mounting brackets, and I can't screw the boards in when the stairs are in place. Instead I built up the framing, then I have to flip the framing up, attach the boards then put the framing back in place and bolt it down. I should be able to finish up the stairs this weekend - then I only need to put on another coat or two of stain...

Posted by Picasa

Wednesday, August 26, 2009

Water Bottle Rocket

A couple of weeks ago we saw the episode of 'Ask This Old House' where they build 3 projects for kids - a garden, indoor putt-putt course and a water rocket. They've got an article on their site about how to build the rocket and some other family friendly projects.

The guy they had on the show to demonstrate how to build a rocket has his own website at http://www.sciencetoymaker.org, and you can also check out his original plan on how to build a water rocket. He's got step by step videos on what to do, a materials list and launching tips. That's where we went to get our plans.

After raiding a couple of recycling bins for 2 litre pop bottles, we headed out to Home Depot to pick up the PVC pipe needed for the rocket launcher. Unfortunately the one near me does not stock it. Next we tried Canadian Tire - Bingo. Well, almost. I didn't realize it at the time but I bought CPVC instead of PVC and the instructions specifically call for PVC. In the materials list which I had printed out and brought with me it says 'PVC--not CPVC!--plastic pipe', unfortunately I somehow missed that.

When it came time to put the launcher together, the CPVC has a smaller diameter than PVC and the bottle does not fit as well. To seal the bottle to the tube, you use a candle to heat and expand the tube. This turned out to be the most difficult part with the CPVC, I assume it is much easier with PVC which does not require as much expansion.

In any case I eventually got it to seal after wrecking a few feet of the CPVC, and wrapping the expanding section in teflon tape. I also had to cut down the outside of the tire valve to get it to fit within the CPVC cap and the hose clamp I had on hand to secure the cable ties was just big enough to squeeze over the ties.

After much fiddling around it is now working well. We've probably launched it 30-40 times and it's great fun. Both Lauren and Joshua love it and so have the other kids that have been over to see it. I'll probably build another one out of PVC as the bottle seal on the launcher leaks on me for every launch, but until then we'll be launching this one.


Joshua drilling the end cap for the tire valve


Our first successful launch


Getting ready for the next launch

Tuesday, August 25, 2009

Performax 16-32 Sander


A New Tool!

I have almost all the tools I need or want in my shop, but one of the ones I've wished for a few times is a drum sander. I found a good deal on a used one this weekend and was allowed to purchase it.

I picked up a Perfomax 16-32 sander for a little less than half of what they cost new. This one is the older model which was Made in the USA and comes with a good Leeson motor. It came with a few pre-cut rolls of 80 grit paper and one roll 120 grit paper. It looks like these rolls cost about $8 each, so I may try and cut my own from longer rolls.

I only had time to plug it in and run one piece of wood through it. The tension rollers need to be adjusted, but the machine is in fine shape. I changed out the sandpaper roll to see how easy it was and it was a piece of cake.

Now I need to find another spot in the workshop for Joshua's workbench as it had to move for the sander.

Friday, August 21, 2009

New Workshop - Layout

My first workshop was a room in the basement of our first home. Though it was very convenient to be able to walk down the stairs and do some work, getting material up and down the stairs was aggravating to say the least. The narrow room was also awkward to work in.

I was very happy to have an extra garage with our new house which has become my permanent workshop. I've been working in it for about two years now and am very pleased with the size and location of the shop. It's at the back of our yard, only a short walk from the house. Since it has nice big (insulated) garage doors, I can open them on nice days to keep an eye on the kids or to move materials in and out.

Recently I measured out the workshop and drew up a plan in Sketchup. You can find a wide array of tools in the Sketchup 3D Warehouse, and I found another good resource from John Yurko on his website at http://www.yda-online.com/shopmodels.htm. He's got a number of common tools that you can use to help map out your current or future workshop.

Below you can see what my workshop looks like in Sketchup. You can see the original Sketchup file in the 3D warehouse here.

Thursday, August 20, 2009

Hammer Peg Toy - Part 1

Someone posted a picture on Sawmill Creek the other day of a hammer peg toy that he'd made for his grandchildren. He said that the both the young and old kids loved it and I figured it was high time I made one up for my two kids.

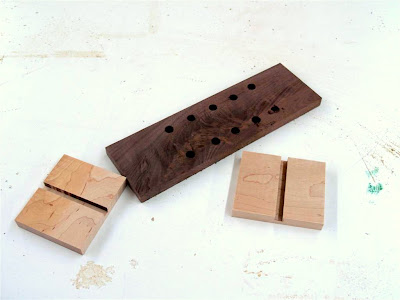
Joshua came out to the workshop to help me with this one. First we dug through the wood pile to find a piece of walnut to form the bench after running it through the jointer, tablesaw and planer it was ready to get drilled.

I consider the drill press a pretty safe tool and Joshua has used it in the past. I set up the fence and clamp the piece in place and let him do the rest. He put 10 1/2" holes in this bench piece.


Though Joshua likes drilling holes, the other thing he really likes is cleaning up. Well, using the shop-vac anyways. The Fein Turbo II does a great job cleaning up around the shop, it's reasonably quiet and the additional 1 micron filter and bag kit make it pretty safe to use. The auto-start works great for sanding with my random orbital sander.


I found a small piece of cherry to cut up for the bench ends, and ran them through the 3/8" spiral cutter I already had on the router table to cut the dado for the bench. Next I put the bench back through the planer to size it for the dado.


After a quick dry-fit and a little bit of sanding we added glue and clamped it up to dry.


Though Joshua will no doubt get some use out of the bench, it's really for his baby sister. Lauren came out to test the bench out. I cut a few dowels for her test. I think she likes it! The mallet head is made from some scrap 1" dowel I had left over from another project, a half inch hole drilled in it then a 1/2" dowel glued into the hole for a handle.


I'll finish up the project with a coat of Watco Danish Oil, cut the rest of the pegs and smooth out the sharp edges, then turn it over to Lauren and Joshua.

Wednesday, August 19, 2009

Morris Chair Complete

It looks like I completed the finish on this Morris Chair back in June 2007, and purchased the vinyl for the cushions a month or two later. Then we waited about a year and a half to move on to the next step - actually finishing the cushions.

I'd planned to do this myself as it the magazine and video make it look really easy. When we asked a knowledgeable sewing person about it she said it would be a little more difficult than we thought. Since I've got lots of other things on my plate without having to learn upholstery, we decided to pay someone to finish this project off.

Back in January we dropped off the vinyl off at a upholstery repair shop and they put together the three cushions for us a reasonable price in about two weeks. I left the stool with them and they put the cushion in the stool, but for the chair I only gave them the frame for the cushion.

That turned out to be a mistake. The added thickness of the cotton batting and the vinyl meant the chair cushion would not fit. Argh. Rather than returning and getting them to fix my mistake, I pulled the material back off one end of the frame and then ran the frame through the tablesaw to cut off 1/4". It took a few tries but I got it to work.

The end result is a very nice chair. The cat loves to sleep on it, and I get to try it out once in awhile.

Deck Replacement - Part 4

The railing installation was no fun. The posts were easy enough to bolt to the joist, and cutting the pre-drilled rails to size was no problem. Lining up 14 metal balusters in between the two rails was a major PITA. After getting the all the balusters squeezed into the bottom rail, I started from one end, clamping the top rail into place and then lining up the other balusters one by one until I worked my way all the way across. This is definitely not something to try at the end of a long day - wait until you are fresh before trying this as it will try your patience.

In any case, we are very happy with the end result.


Once the railing was in place, I moved on to the wrap-around stairs. I built out the bottom stair as a box of 2x8s and then added the smaller step on top. The front of bottom box is bolted to a short 4x4 that is anchored to the concrete patio. The previous steps rested directly on the concrete and gravel ground and were rotten on the bottom (no surprise). The back end of the box is bolted to the deck structure and is again off the ground.

These steps and deck should last for a long time.


I placed some scrap plywood and OSB onto the steps for a temporary step as I won't be able to finish them up for a couple of days.


Monday, August 17, 2009

Railroad Clock Kit - Glass Install (2) - Finished

After breaking the first piece of glass I tried to install, it took me a few days to work up the courage to try this glass install again.

Rather than an 18ga stapler, I chose the 23ga pin nailer to nail in the rubber glass stop strip this time.


This time things went much smoother. I used scissors to cut the rubber glass stop to size, then used the pin nailer to tack it in place every 3" or so along the outside of the glass. Since the door has a rabbet around the outside, the rubber stop is not visible when the door is closed.


The last steps were to clean the glass well, stick on the decal and then mount the clock on the wall. There are two holes in the 1/4" back panel of the clock and it was easily mounted with a couple of drywall anchors.


This was a fun and pretty easy to build project. The instructions and clock kit from Lee Valley were good and I'll probably end up building another one for our upstairs. Though the next time I won't take a year to finish it!

Thursday, August 13, 2009

Kids Table - Part 3

Not much to finish up this project. I smoothed out the joints in the top with a belt sander and a 100grit belt, than used a Random Orbital Sander to sand everything with 120 and 220 grit discs.

A few swipes with a 100 grit sanding block to ease over all of the sharp corners, and a few extra swipes to ease up the bottom edges of the legs.

The legs and stretchers were glued and clamped overnight, with a few screw blocks added to the stretchers. Before attaching the blocks, I drill oversize holes in them which will then be used to attach the top.

Once everything had a chance to dry I applied Watco Danish Oil, following the directions on the can. Wipe on and wipe off. Couldn't be easier.

Lastly the table was moved back into the house where it was immediately put to use.


Now I've got to make up some chairs to go with it...

Wednesday, August 12, 2009

Deck Replacement - Part 3

On the last deck I built I used a hidden deck fastener to attach the deck boards and was very happy with the results. It definitely took more time to do the install, but I feel that the end result was worth the extra time.

For this deck I picked up the same product that I'd used previously - it's from Peak Products and is available at my local Home Depot. The Peak website says that it is only available in Canada, but it seems to be the similar to a product called 'Deckmaster' [amazon link]from Grabber. At about $3 each they were not outside my budget for this deck.

The rails come in 45" lengths and cut easily to size with tin snips.


Installation is a piece of cake. Lay them on top of the joists and put a 1 1/2" galvanized nail into every other hole.


The installation instructions say to alternate joist sides for adjacent rails. If you have any joists where the deck boards will meet end to end, then install a rail on each side of the joist.


As you can see from the pictures I've pre-stained my deck boards. It's a pain to do but I like that all four sides get stained. I'll add another coat on top after the install is complete.

After the rails are in, it probably takes about twice as long as hand screwing a deck from the top and maybe four times longer than if you are using a drill with an auto screw feeder. Again, I feel it's worth it for to have no screws on top of the deck. I'm hoping this deck will be around for at least 10-15 years, so a bit of extra time spent on the install will be worth it to me.

Once the rails are in, it's time to install the deck boards. I think the display at Home Depot has a picture of a guy installing the under deck screws by kneeling on an already installed board and leaning over to install the screw like this :


In reality, your only chance to get the screw in the hole is to crouch over like this :


It's not really practical and pretty slow. You could also try coming at it from the uninstalled portion of the deck - like this :


Again I find this difficult to get the screw in the hole and keep pressure on the impact driver to get it into the deck board.

The best way that I found to install the decking boards was to clamp the board in place, then slide under the deck (on a piece of cardboard) and drive the screws up from underneath. Even with a bare minimum of clearance I was able to squeeze under and get the job done. Not fun, but it's doable.


The holes on the rails are space about 1" apart and the installation instructions say to install two screws per joist. Depending on where your deck boards end up, you can usually put in three or four to hold down a particularly warped joist.

I like this product and will likely use it again if I move and have to build a new deck :)

Railroad Clock Kit - Glass Install (1)

We've had the Railroad Clock in the house for the past few days and have really enjoyed it listening to it chime out the hours. It also chimes on every 15 minutes which is a little much, but we haven't grown tired of it yet. From reading the generic directions I don't think the 15 minute chime can be disabled, but the chime can be completely turned off.

The last thing I needed to finish up for the Railroad Clock was the glass install for the door. We made a trip out to our local Home Hardware to get a piece of glass cut ($8.99) and pick up a few drill bits I needed. The guy who cut it was a little unsure of his glass cutting abilities, but he got the job done. I had them pack it in some cardboard for the trip home.

After getting it home and bringing the clock and the glass out to the workshop for the install, I unpacked the glass only to find a big scratch across the glass. Argh. Back to Home Hardware to exchange the glass, this time I checked the glass before leaving the store.

Back home and into the workshop for the install. The instructions suggest using an 18g staple gun , so I pulled mine out, laid out the rubber glazing bead and blasted the first staple through the glass. Oops.

My $9 glass door has now become a $18. At least. I haven't got the replacement yet. I'm a little afraid to do it.

Tuesday, August 11, 2009

Deck Replacement - Part 2

After tearing out the deck, the next step was to get support piers installed for the posts. Rather than burying the posts directly in the ground, I opted to install cement piers and attach the posts to the cement, above the ground with simpson hardware.

Rather than renting an auger and hauling and mixing the cement myself, I opted to get someone out to dig the holes and pour the cement for me. At $30 a hole for 6 holes it was well worth the money.

Once the holes were in, it was time to move onto properly installing the ledger board. I snapped a chalk line about 1 inch below the patio door and ran the circular saw along the line to start the cutout for the ledger board. Since I have wood siding, the siding should be cut away before the ledger board is attached to the house.

After removing the wood siding I found the OSB sheathing behind seemed a little rotten, so I ran the saw over that line again and removed the OSB. Behind that - yep more rot. The joist and sill were rotted and in dire need of replacement. All the joist under the patio door as well as 1'on the left and 2' on the right needed replacement. The sill plate needed replacement as well.


Luckily the other floor joists run parallel to this one, so I did not have to worry about the other joists when replacing this rotted one. A quick trip to the hardware store to pick up a new joist, PT sill, OSB and 'smart siding' to replace the wood siding and then back to work.

The old joist and sill was removed with a sawzall, then the new joist and sill slipped in. I was very surprised that I was able to remove the sill anchor nuts and reuse them. A little bit of break-free and the impact wrench pulled them off without difficulty.

I slid some flashing up under the wood siding to prevent water from getting behind the new ledger board. After applying some tar paper to replace the housewrap, Joshua jumped in to help me bolt the ledger board in place. It was actually in good shape and I was able to reuse it and the attached joist-hangers.


After the ledger board was installed I installed the OSB 'smart siding' product that matched close enough to my original wood siding. It'll be hidden under the deck and if I finish up the deck with a skirt it'll never be seen.

The new deck will have just about the same footprint as the old one, just a few feet wider to make more room for furniture on the deck. I installed the outer joists which were all new wood, and to save a few bucks reused the joist hangers from the old deck - not much fun removing those. A cat's paw and wonder bar helped me get them out in a reasonable amount of time with no damage.


Eventually I had all the joists filled in and was ready to start with the decking.

Monday, August 10, 2009

Deck Replacement - Part 1

When we moved into our house two years ago, I knew that the deck was in need of replacement. Though not in any real danger of falling off the house, there were rotted boards all over the place, and individual board replacement would not be enough to salvage this deck.

Age was part of the problem, the rest was due poor design and construction that left gaps for leaves, needles and keys from nearby trees to collect in. The gutters high above the deck also clogged with these same leaves and after clogging dumped the water directly onto the deck from two stories up.

We picked the wood up a few months ahead of when I would start the project, then stacked and stickered it in the garage to dry out a little. For outdoor projects I prefer to stain them before installation, letting me easily get all four sides of the wood and so I wanted to give the wood a chance to dry before staining. The 10% off sale was another good reason to buy the wood early.

The only part of the deck I planned on saving were the joists under the deck, as I figured everything else was too rotten to reuse. As I tore the deck apart I could see that I was right. The more I took out the more I could see how rotten it was.


Even the support posts were rotting out - having been buried directly in the ground a few snapped off at ground level when I tried to pull them out.


Eventually I ended up with a large pile of rotten wood and a much smaller pile of usable wood. Though the tops of most joists had some rot, I planned to flip them over to reuse them so only two of the joists were completely unusable.

After pulling the ledger board from the house I found the worst rot. The ledger was bolted directly to the house, against the wood siding. I'm glad it was at least bolted with galvanized bolts into the joist and not decking screws, but the siding was ruined behind and below the ledger board. Parts of it were so rotted that it crumbled when I touched it.

Franklin Step-Stool

I managed to get another project finished off that's been hanging around the workshop. I'm not sure when I started this one, I'd guess probably about 10 months ago. It's from a plan in Canadian Home Workshop magazine.

Two coats of Minwax provincial, followed by two coats of Minwax Satin Polyurethane was the finishing schedule for this project. After that it was a simple matter to attach the two hinges and the chair/step-stool combo is ready for use.

Joshua and Lauren tested it out for me and pronounced it good. Though shortly after trying it out Joshua said we should cut it up and build it again - lately he's been playing with Lego's a lot.

Craftsman Mailbox - Step 6 - Completed!


Finally. After three coats of Minwax Helsman Spar Urethane (applied with a throw-away foam brush) the mailbox was done. Well, almost.

This was the first time I've used the Spar Urethane. It went on just like the polyurethane I usually use. I had a few runs from applying it too thickly but for the most part they sanded out in between coats - a few I left for character :)

I added added two hinges and two rubber pads that came with the hinges to prevent the top from making a racket when dropped shut.

I secured it to the house with two 2" decking screws through countersunk holes inside the mailbox and am now waiting for the mailman to drop off our first mail in the new mailbox :)

Before


After

Friday, August 7, 2009

Kids Table - Part 2

After all legs and table top dried overnight, they were ready to be finished off.

After scraping the excess glue off the tabletop with an old chisel, I squared it up using the sliding table on the table saw at 24".

The legs had little or no excess glue so they went directly over to the planer where they were all dimensioned to 1 7/8". Next the miter saw was used to trim them all down to 21".

It's best to cut mortises before tenons when using a fixed mortise size, so it was time to cut the mortises in the legs that would receive the tenons on the end of the stretchers. In the past I've made up a custom jig for my router and then use a spiral bit and a template guide to cut the mortise. I decided to try just using the router table this time and skip the custom jig to save time - I'm glad I did.

With a 1 7/8" leg, the center point of the leg would be 1/2" + 7/16" = 15/16". Subtract half of the spiral bit of 3/8, 15/16" - 3/16" = 12/16" = 3/4". That's the distance I set the edge of the bit from the router table fence. After testing on an offcut from one of the legs to make sure the mortise was centered I was ready to go. I marked the stop location on the fence to give me a 2" mortise and went to work. I set the bit at about 3/8" in height for the first pass and 3/4" for the second. I slid each leg into the bit along the fence and easily cut the mortises. Since the leg was pressed up against the fence where the dust collection is I clamped a shop vac to the fence in line with the bit to catch the shavings to save on cleanup.

The stretchers were next up. Over to the table saw where used the end of one of my still too long stretchers to set the height of the blade. I use my normal combination blade (Delta 35-7640) to make the first cuts for the tenons, then switch to a dado blade to clean out the rest. After getting the height set I sized down the stretchers on the miter saw and then it was quick work to cut the tenons on the stretchers.


After all the cutting was complete - a quick check to make sure everything fit properly.